
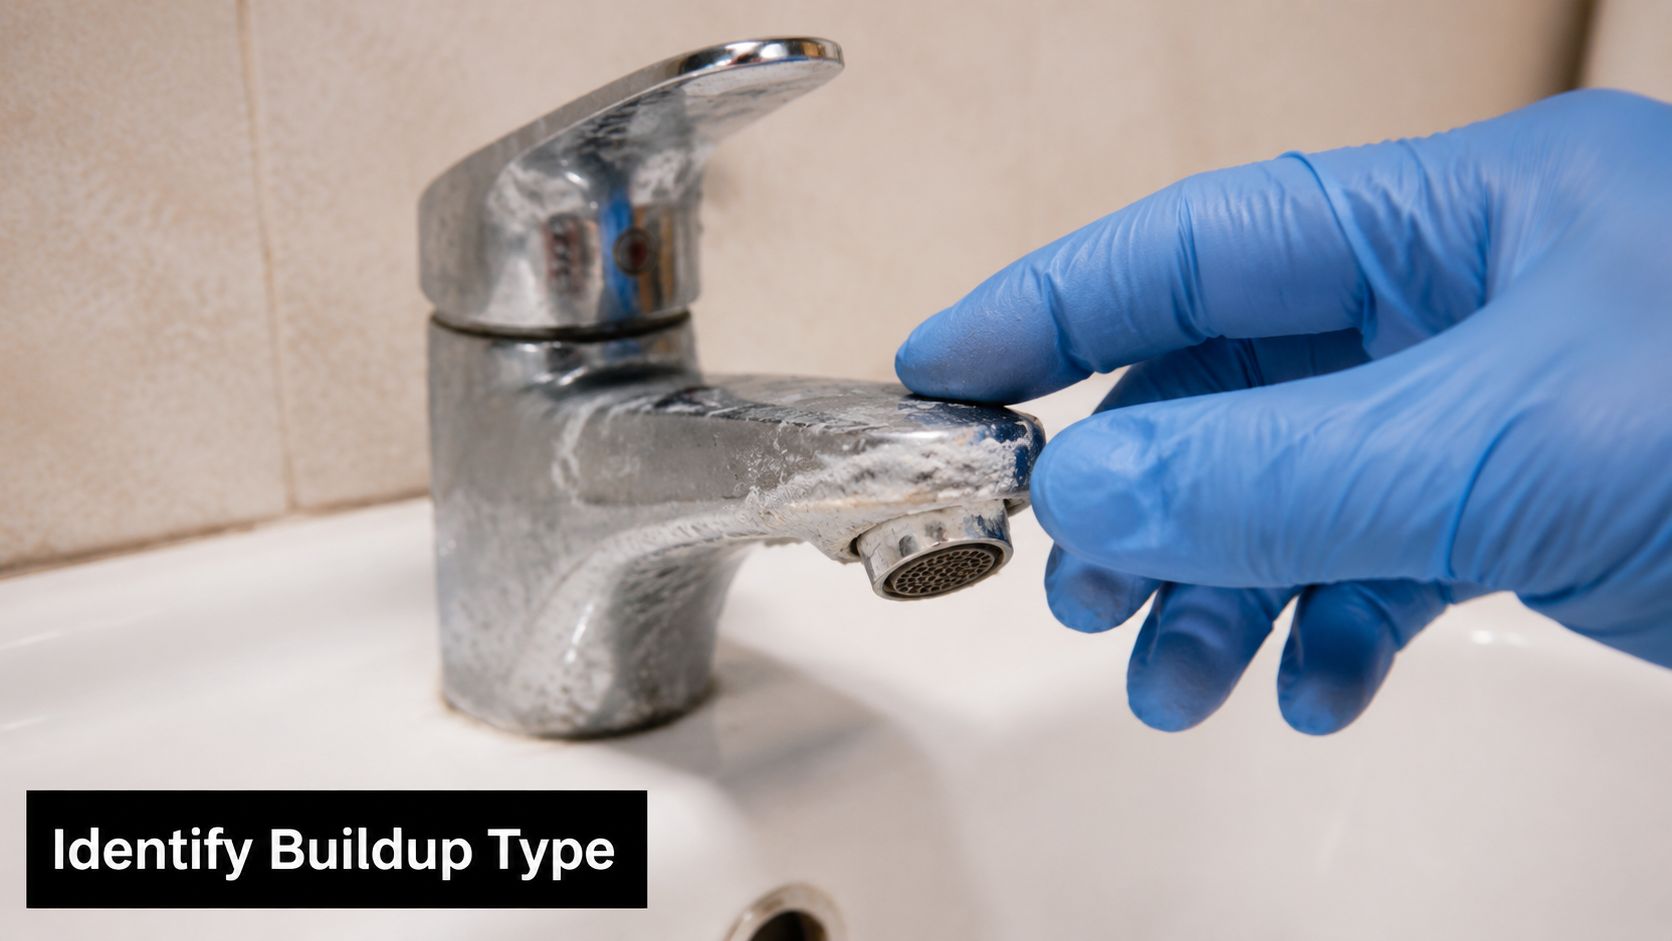
You wipe down the faucet. It looks clean for about a day. Then the white spots come back. The shower door fogs over with a crusty film, the coffee maker starts looking tired, and the dishes never seem fully clear no matter how hot the cycle runs.
That's the hard-water routine in a lot of Central Florida homes. What is often called “calcium buildup” is usually limescale, the mineral residue left behind as hard water evaporates. The frustrating part isn't just that it keeps showing up. It's that many homeowners use the wrong cleaning method for the wrong kind of deposit, scrub too aggressively, and end up with dull fixtures or damaged surfaces while the underlying issue stays in the water.
The better approach is simple. First, identify what kind of buildup you're seeing. Then remove it with the least aggressive method that fits the material. After that, stop treating the symptom alone and deal with the source. If you're already seeing recurring scale on fixtures and appliances, it's worth learning how water softening works at the whole-home level because repeated cleaning only goes so far.
Table of Contents
- That Chalky Film The Unwelcome Guest in Your Home
- Identify the Enemy Is It Carbonate or Silicate
- Your Arsenal for Calcium Buildup Removal
- Safety First Common Mistakes to Avoid
- Stop Cleaning and Start Preventing
- When to Call for Professional Water Treatment
That Chalky Film The Unwelcome Guest in Your Home
You wipe down the faucet on Saturday, and by Tuesday the white ring is back. Then the shower starts spraying sideways, the glass gets spotted again, and the dishwasher leaves that dull film on clean dishes. In homes across Florida, those are usually not separate cleaning problems. They are symptoms of the same hard-water issue showing up in different places.
That chalky residue is what homeowners usually call calcium buildup or limescale. It forms as mineral-heavy water dries on surfaces and leaves deposits behind. At first, it looks cosmetic. In practice, it also clogs aerators, narrows showerhead openings, shortens the time between cleanings, and leaves appliances working harder than they should.
I see the same pattern in service calls all the time. The homeowner has tried vinegar, a brush, maybe a stronger bathroom cleaner, and the buildup still returns. That repeat cycle matters. Fast reappearance usually points to untreated hard water, not poor cleaning habits.
Practical rule: If the white film comes back shortly after cleaning, the water is still feeding the deposit.
A lot of articles stop at removal tips. That misses the real decision homeowners need to make first. Some deposits are the common chalky scale that often responds to mild acid and patient scrubbing. Some are harder, more bonded mineral deposits that can resist standard cleaning and punish the wrong method. If you misidentify the buildup, you waste time and can scratch fixtures, damage finishes, or strip protective coatings.
Surface cleaning has its place. Prevention matters more. If buildup is showing up on multiple fixtures, the long-term fix is usually whole-home water softening for hard water control, not another round of scrubbing.
Identify the Enemy Is It Carbonate or Silicate
Before you soak anything in vinegar or reach for a scraper, figure out what kind of deposit you have. That's where most bad advice starts. It treats every white crust like the same material.
Pool and surface-maintenance guidance has highlighted a gap that homeowners run into all the time. Most content explains how to clean, but not how to identify the deposit first. That matters because calcium carbonate is often removable with milder acidic or mechanical methods, while calcium silicate is much harder to remove and may call for specialized treatment or professional bead blasting, as noted in this guide on pool tile calcium scale identification.
Start with what you can see
You don't need a lab test for a first pass. You need observation.
- Texture matters: Calcium carbonate often looks chalky, flaky, or crusty. It tends to sit on the surface like a deposit you can feel.
- Hardness tells a story: Calcium silicate usually feels denser, harder, and more fused to the surface.
- Location gives clues: Deposits forming around routine splash and evaporation points often lean toward carbonate. Older, stubborn buildup in areas exposed to repeated heat or long-term neglect can be more resistant.
- Appearance helps: If it looks more like a dull white crust, carbonate is more likely. If it has a tougher, almost cemented look, be more cautious.
Try a simple acid response check
A small spot test can save you from making a mess.
Put a drop of white vinegar on a hidden area of the deposit. Give it a moment. If you see a visible reaction and the spot starts loosening, that points more toward calcium carbonate. If nothing meaningful happens, don't assume you just need stronger acid. That's where homeowners often damage finishes.
If the deposit ignores a mild acid test, step back before escalating. Resistance can mean you're not dealing with a simple carbonate crust.
A few common sense checks help too:
- Use a hidden spot first: Test behind a faucet, low on a toilet bowl, or on a less visible tile edge.
- Check the surface underneath: Chrome, brushed nickel, fiberglass, stone, and grout all tolerate cleaning differently.
- Look for layering: A deposit may have an easier outer scale with a harder layer underneath. That's why some jobs seem to “half work.”
This diagnosis step is what makes calcium buildup removal safer and faster. It keeps you from treating every white mark like it should melt off with the same kitchen remedy.
Your Arsenal for Calcium Buildup Removal
Once you know you are dealing with a deposit that should respond to household descaling, the job is less about scrubbing harder and more about matching the method to the surface. In the field, I see two problems over and over. Homeowners either use too much force on a deposit that needed more dwell time, or they use the same cleaner on every finish in the room.
Hard water scale is usually a repeat problem, not a one-time cleanup. That matters because the best removal method is the one that clears the buildup without shortening the life of the fixture you are trying to save.
Faucets, showerheads, and sink trim
Start with white vinegar, a microfiber cloth, a nylon brush or old toothbrush, and a plastic scraper. For light to moderate carbonate scale, that covers a lot of jobs safely.
Wrap vinegar-soaked cloth around the affected part of the faucet and give it time to soften the deposit. Then brush around the base, handle joints, and aerator threads. If the aerator comes off, remove it and soak it separately. That keeps loosened mineral from packing deeper into the screen.
Showerheads usually respond well to a bag soak. Fill a small plastic bag with enough vinegar to cover the spray face, secure it, wait for the buildup to soften, then brush the nozzles clean. If the finish is decorative, test a hidden spot first and keep the soak focused on the mineral, not the entire fixture body.
Use time and contact. That removes more scale than aggressive scrubbing.
Toilets, glass, and small appliances
Toilet bowls often develop a mineral ring where water sits. Keep the cleaner on the ring instead of flooding the whole bowl. Vinegar-soaked paper towels can hold contact on the deposit above the waterline or around rim jets, then a toilet brush can do the rest. Avoid metal tools inside glazed porcelain. They can leave scratches that collect more staining later.
On shower glass and door frames, spray the cloth instead of the whole surface when possible. That gives better control around metal trim, stone accents, and caulk lines. Wipe, let the acid work for a few minutes, then rinse and buff dry so you are not leaving mineral-rich water behind again.
Coffee makers, kettles, and similar appliances need a different mindset. The scale is inside the equipment, and the manufacturer's cleaning instructions come first. If vinegar is allowed, run the cleaning cycle and flush with clean water until the smell is gone. If the manual calls for a branded descaler, follow it. Replacing a damaged heating element costs more than buying the right cleaner.
Dishwashers often show the broader hard-water problem. You see cloudy glasses, crust near the filter, and residue around the door edge. Surface cleaning helps, but it does not change the water feeding the machine. Homeowners who also want better-tasting point-of-use water often pair softening with a reverse osmosis drinking water system.
DIY Calcium Removal Agent Comparison
| Agent | Best For | How to Use | Caution |
|---|---|---|---|
| White vinegar | Light to moderate carbonate scale on faucets, showerheads, glass, and some appliance parts | Soak a cloth, wrap the area, or use a bag soak on removable parts | Test first on delicate finishes and check appliance guidance |
| Baking soda paste | Residue cleanup after mineral scale has already softened | Apply with a soft cloth or sponge, then rinse well | Heavy pressure can still dull glossy surfaces |
| Plastic scraper | Thick deposits that have already loosened | Hold at a low angle and lift softened buildup carefully | Can gouge chrome, acrylic, fiberglass, and soft coatings if forced |
| Soft nylon brush or old toothbrush | Seams, nozzles, threads, and textured spots | Brush after soaking to clear detail areas | Do not swap in steel bristles |
| Commercial scale remover | Stubborn buildup that does not respond well to vinegar | Follow the label exactly and spot test first | Surface compatibility matters, especially on stone, grout, and specialty finishes |
A few basic tools make repeat cleanups easier:
- Microfiber cloths: Good contact with less scratching.
- Nylon detail brushes: Useful for aerators, grout lines, and tight corners.
- Rubber gloves: Mild acids still irritate skin.
- Spray bottle and small bowl: Better control, less runoff onto nearby surfaces.
If you keep descaling the same fixtures every few weeks, the cleaning method is no longer the actual issue. The water is.
Safety First Common Mistakes to Avoid
The biggest mistake homeowners make isn't using too little cleaner. It's using the wrong cleaner or the wrong tool on the wrong surface.
Removal chemistry changes with the deposit itself. Guidance on calcium scaling notes that calcium silicate is far more resistant than calcium carbonate and may require specialized products that can take a long time to work. Using the wrong approach can be ineffective and can damage surfaces, according to Latham's discussion of calcium scaling treatment methods.
Do this not that
- Use plastic or nylon, not steel wool: Steel wool can scratch chrome, leave behind fine metal residue, and make fixtures look permanently dull.
- Use spot testing, not blind soaking: A cleaner that works on porcelain may harm natural stone, colored grout, or specialty coatings nearby.
- Use patience, not brute force: A deposit that hasn't softened yet won't come off better just because you press harder.
- Use one cleaner at a time: Don't mix household chemicals. If you've already used one product, rinse fully before trying another.
Natural stone deserves extra caution. Marble, travertine, and some decorative tile can react badly to acidic cleaners. So can some polished finishes. If you're unsure what the surface is made of, pause before applying anything stronger than a mild test spot.
Know when to stop
There's a point where DIY stops being smart.
If a deposit doesn't respond to a gentle acid test, keeps returning in the same thick form, or appears fused to the finish, repeated escalation usually creates more damage than progress. That's especially true around pool tile, fiberglass surrounds, specialty plumbing trim, and older fixtures with worn coatings.
Surface damage is easier to cause than to reverse. A scratched fixture may stay scratched long after the scale is gone.
Good calcium buildup removal work is controlled. The right chemical, the right contact time, the right tool, and the right amount of pressure. Not more.
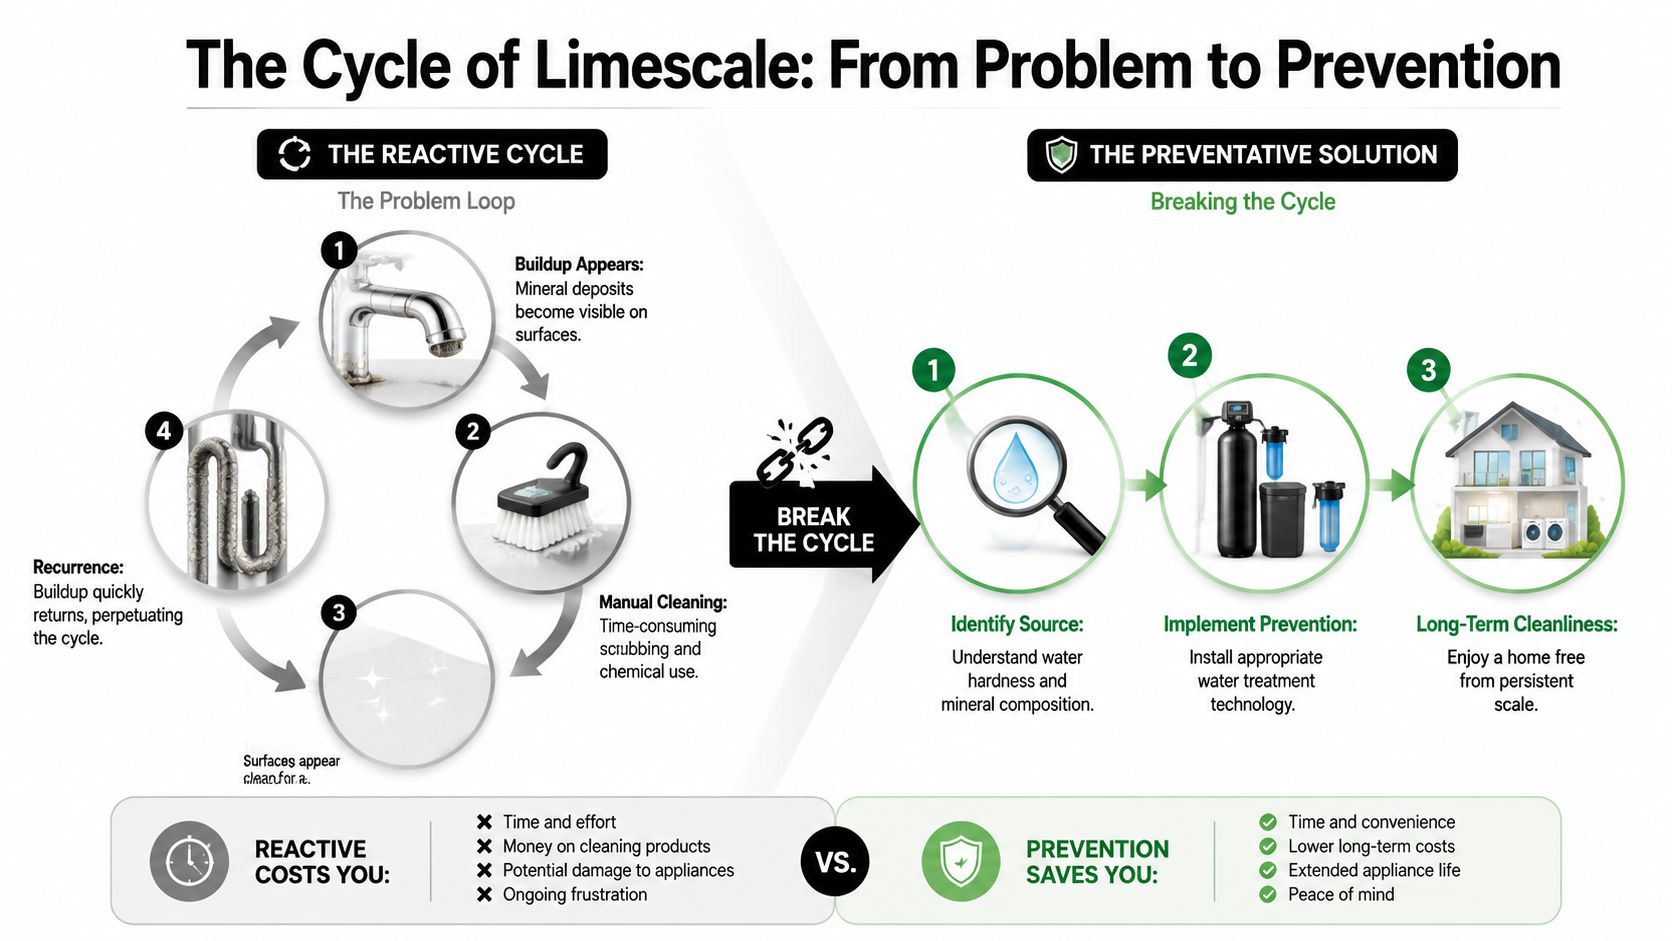
Stop Cleaning and Start Preventing
Scrubbing scale off a faucet is maintenance. It isn't a cure. If the water entering the house still carries the minerals that create limescale, the cycle keeps going. Clean, rinse, repeat.
That's why the long-term fix isn't a stronger bottle of cleaner. It's changing the water before it reaches the fixtures, water heater, showerheads, dishwasher, and appliances in the first place.
What prevention changes
When homeowners only clean scale, they stay in a loop:
- Buildup appears: Spots, crust, cloudy glass, rough fixtures.
- You clean it off: Vinegar, brushes, soaking, scrubbing.
- It looks better for a while: Then the minerals come back.
- The same surfaces need attention again: Often sooner than you'd like.
Preventive treatment breaks that loop by addressing hardness at the source. In practical terms, that means fewer visible deposits, less time spent descaling, and less wear on fixtures and water-using equipment.
Why softening is the real fix
For whole-home hard water, softening is the most direct prevention strategy. Rather than waiting for water to evaporate and leave minerals behind, a softener removes the hardness minerals before they circulate through the house. If you're comparing long-term options, this overview of the benefits of a home water softening system is a useful place to start.
A good prevention mindset changes the questions you ask. Instead of “What removes this deposit fastest?” the better question is “Why am I getting this much deposit in the first place?”
That shift matters in Florida homes because scale rarely stays limited to what you can see. It also affects shower performance, cleaning time, appliance upkeep, and how often you feel like you're fighting your water instead of using it.
Clean surfaces are the short-term win. Treated water is the long-term one.
When to Call for Professional Water Treatment
Some buildup is a housekeeping issue. Some is a water-quality issue that keeps showing up as housekeeping. Knowing the difference saves time, fixtures, and frustration.
If you're cleaning visible scale but also dealing with reduced water pressure, recurring spotting after diligent cleaning, crust forming at multiple fixtures at once, or sediment-like material showing up with the water, the problem is usually bigger than one faucet or one appliance. That's especially true in homes on private wells, where hardness may show up alongside iron, sulfur odors, staining, or other water challenges.

Signs the problem is beyond surface cleaning
A professional assessment makes sense when you notice patterns like these:
- Flow problems: Showerheads clog repeatedly or faucet output weakens after cleaning.
- Whole-home symptoms: Kitchens, bathrooms, laundry areas, and appliances all show scale at the same time.
- Surface sensitivity: You're afraid to keep experimenting because finishes, tile, or stone could be damaged.
- Well-water complexity: The water issue doesn't seem limited to hardness alone.
A practical decision rule
If the deposit is light, accessible, and responds to careful cleaning, DIY is reasonable.
If the buildup is stubborn, recurring, spread across the property, or tied to water performance problems, it's time to stop buying another cleaner and find out what's in the water. That's the point where treatment decisions become much easier, because you're no longer guessing.
If you're tired of scrubbing the same white buildup off the same surfaces, the next step is to test the water, not just clean the residue. Florida Water Management offers professional help for hard water, well water, and whole-home treatment solutions across Central Florida. To get started, request a free water test through the contact page and find out what your water is leaving behind.